目次
この記事について
これまでのSTPの検証では、スイッチ間に2本ずつ並行するケーブルのうち、1本はSTPにブロックされて、使われていなかった。EtherChannelは、その2本を1本の論理的なリンク(Port-channel)に束ねて、2本とも使えるようにする技術である。3組のリンクを、3つの方式で束ね、束ならないときの挙動や、1本が切れたときの切り替え時間を、実機で確かめた。
- LACP(標準)、PAgP(Cisco独自)、static(on)の3方式の違い
- モードの組合せで、束なる/束ならないを表にまとめる
- 設定ミス(モード不一致、速度・VLAN・モードの不一致)を再現して、ログを確認する
- 束ねたリンクの1本が切れたときの、不通時間の実測
- L3 EtherChannel(ルーテッドポートを束ねる)の設定の受付確認
1. 検証環境
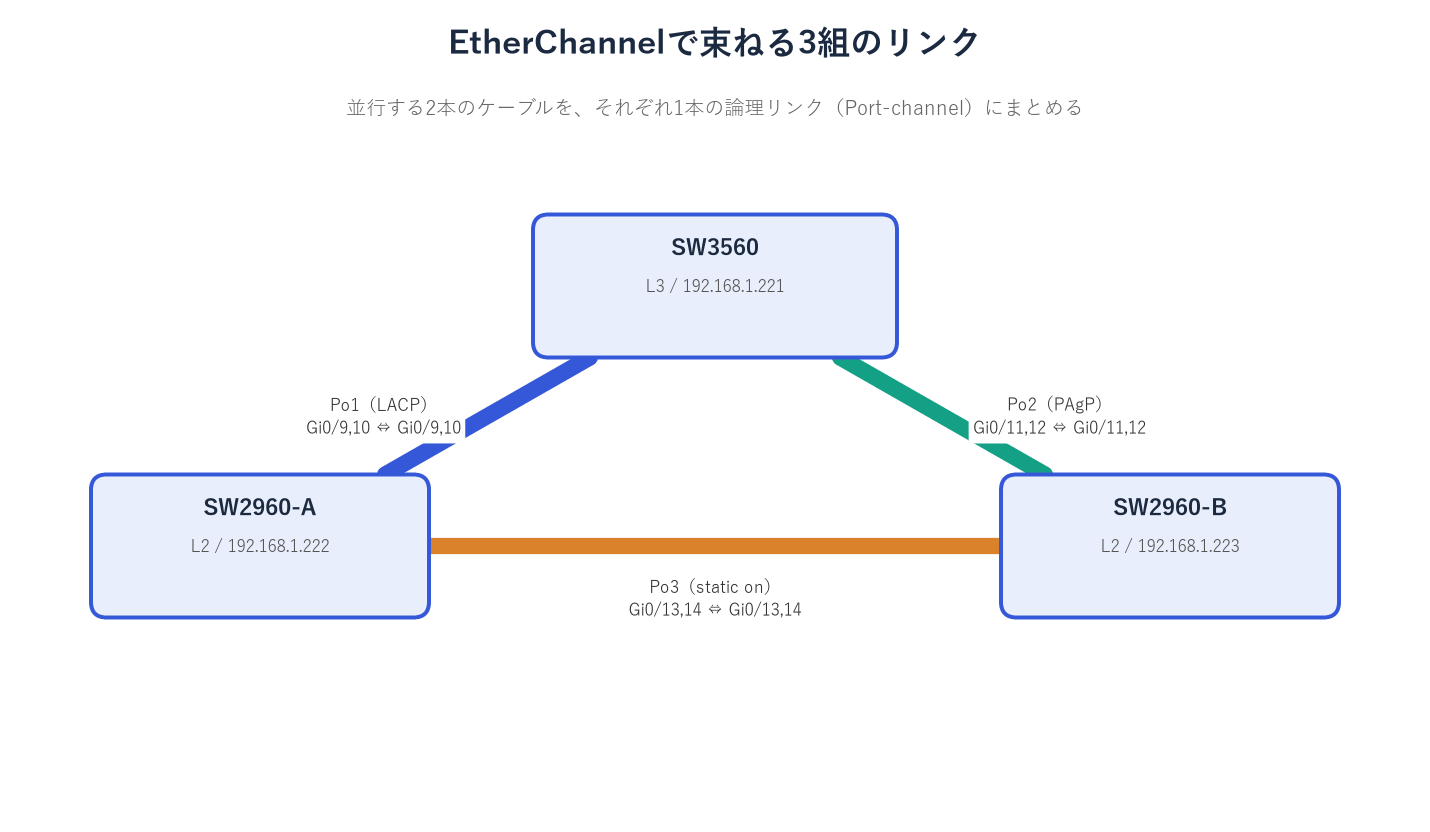
3組とも、2本ずつ配線されている。2-7で一時的にshutdownしていた並行リンク(SW3560 Gi0/10・Gi0/12、SW2960-A・Bの Gi0/14)を元に戻し、6本とも、全二重・1000Mbpsでリンクしていることを、show interfaces status で確認してから始めた。
| Port-channel | SW3560側 | 相手側 | 方式 |
|---|---|---|---|
| Po1 | Gi0/9, Gi0/10 | SW2960-A Gi0/9, Gi0/10 | LACP |
| Po2 | Gi0/11, Gi0/12 | SW2960-B Gi0/11, Gi0/12 | PAgP |
| Po3 | — | SW2960-A Gi0/13,14 ⇔ SW2960-B Gi0/13,14 | static(on) |
測定の方法
PC-AからPC-B(192.168.10.2)へ、100ミリ秒ごとにpingを送るPowerShellのスクリプトを動かし、返事が来なくなった時刻(LOST)と、戻った時刻・途切れた時間(RECOVERED outage)を記録した。100ミリ秒より短い途切れは検出できない。スイッチの操作(shutdown/no shutdown など)の時刻と、LOSTの時刻を見比べて、どの操作による途切れかを判断している。スクリプトの全文と、1行ごとの説明は、Phase 2-7(STP/PVST+)の「切り替え時間の実測」に載せている。
2. そもそもEtherChannelとは何か
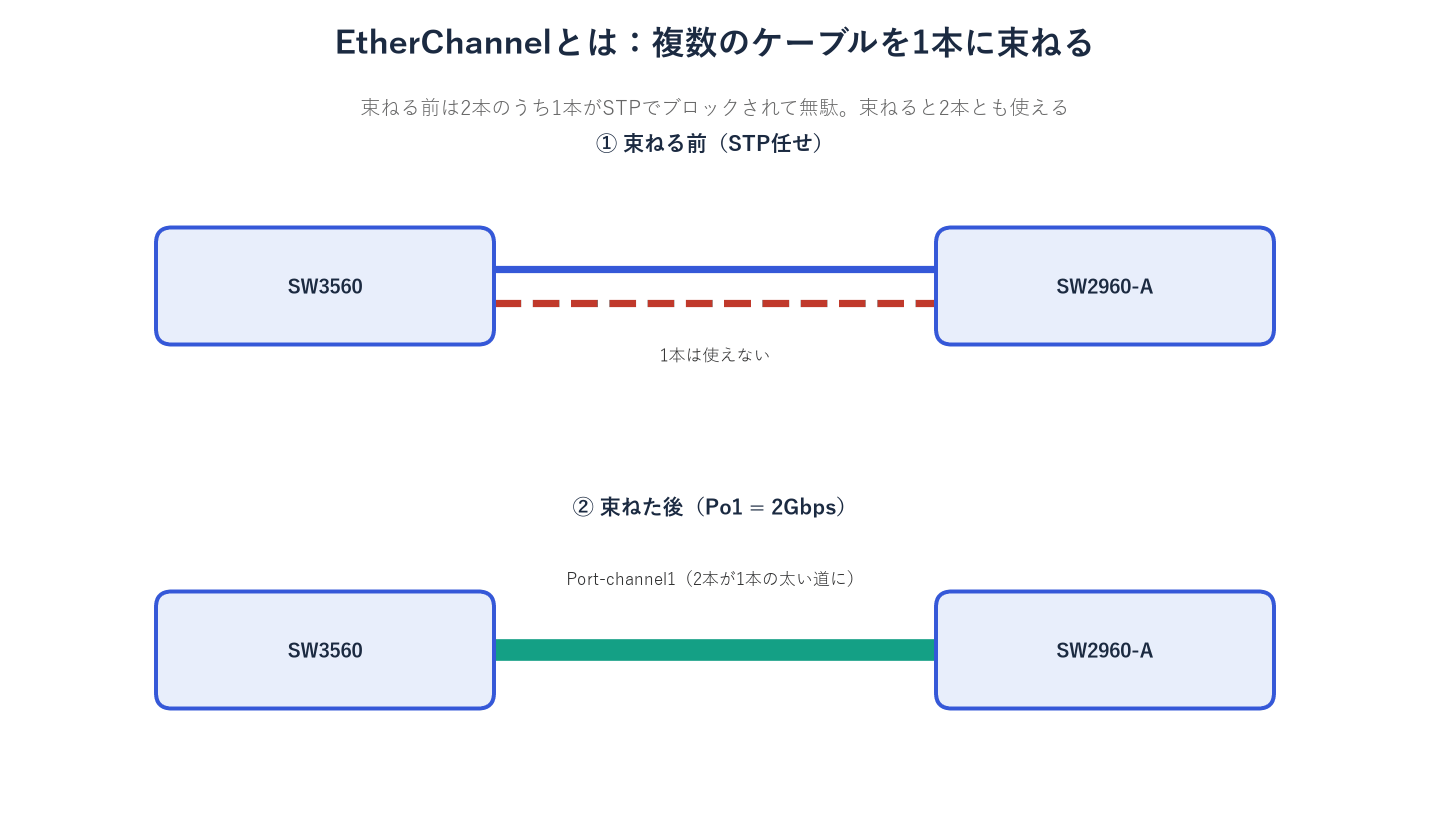
束ねる前の状態を確認すると、並行する2本のうち、片方がSTPのブロック(Altn BLK)になっていた(SW2960-A Gi0/10、SW2960-B Gi0/12・Gi0/14)。EtherChannelで束ねると、STPからは1本のリンクに見えるので、ブロックされるケーブルがなくなり、帯域も2本分になる。
| 方式 | 規格 | モード名 | 束なる条件 |
|---|---|---|---|
| LACP | IEEE 802.3ad(標準) | active/passive | active⇔active、active⇔passive(passive同士は束ならない) |
| PAgP | Cisco独自 | desirable/auto | desirable⇔desirable、desirable⇔auto(auto同士は束ならない) |
| static | なし(ネゴシエーションなし) | on | 両端ともon |
ポイント
束ねるポートは、速度・全二重・VLAN・トランクの設定(許可VLAN・ネイティブVLAN)が、すべて同じである必要がある。異なると、そのポートは (s)=suspended(停止)や (I)=individual(単独)の状態になる。
3. LACPでPo1を構成する(SW3560 ⇔ SW2960-A)
SW3560(config)# interface Port-channel1 ← 束ねた論理リンク(Po1)の設定モードに入る(先に作る)
SW3560(config-if)# switchport trunk encapsulation dot1q ← タグ付けの方式を802.1Qにする(SW3560だけ必要)
SW3560(config-if)# switchport mode trunk ← Po1をトランクにする
SW3560(config-if)# switchport nonegotiate ← DTPの自動ネゴシエーションをしない
SW3560(config-if)# switchport trunk allowed vlan 1,10,20,30,99 ← 通してよいVLANの名簿
SW3560(config-if)# exit ← 1つ上のモードに戻る
SW3560(config)# interface range GigabitEthernet0/9 - 10 ← 束ねる2本のポートをまとめて設定する
SW3560(config-if-range)# channel-group 1 mode active ← Po1に加える。LACPで、自分から束ねようと誘う(active)
設定全体を見る(この設定の後の SW3560・SW2960-A)
version 12.2no service padservice timestamps debug datetime msecservice timestamps log datetime msecno service password-encryption!hostname SW3560!boot-start-markerboot-end-marker!logging buffered 16384enable secret 5 <ハッシュ・非表示>!no aaa new-modelsystem mtu routing 1500vtp domain LABvtp mode transparentip subnet-zero!spanning-tree mode rapid-pvstspanning-tree extend system-idspanning-tree vlan 10 priority 24576spanning-tree vlan 20 priority 28672!vlan internal allocation policy ascending!vlan 10 name TEST-A!vlan 20 name TEST-B!vlan 30 name TEST-C!vlan 99 name NATIVE-TEST!interface Port-channel1 switchport trunk encapsulation dot1q switchport trunk allowed vlan 1,10,20,30,99 switchport mode trunk switchport nonegotiate!interface Port-channel2 switchport trunk encapsulation dot1q switchport trunk allowed vlan 1,10,20,30,99 switchport mode trunk switchport nonegotiate!interface GigabitEthernet0/1 shutdown!interface GigabitEthernet0/2 shutdown!interface GigabitEthernet0/5 description VLAN-Test-PC-A switchport access vlan 10 switchport mode access spanning-tree portfast!interface GigabitEthernet0/9 description Trunk-to-SW2960A switchport trunk encapsulation dot1q switchport trunk allowed vlan 1,10,20,30,99 switchport mode trunk switchport nonegotiate channel-group 1 mode active!interface GigabitEthernet0/10 description Trunk-to-SW2960A switchport trunk encapsulation dot1q switchport trunk allowed vlan 1,10,20,30,99 switchport mode trunk switchport nonegotiate channel-group 1 mode active!interface GigabitEthernet0/11 description Trunk-to-SW2960B switchport trunk encapsulation dot1q switchport trunk allowed vlan 1,10,20,30,99 switchport mode trunk switchport nonegotiate channel-group 2 mode desirable!interface GigabitEthernet0/12 description Trunk-to-SW2960B switchport trunk encapsulation dot1q switchport trunk allowed vlan 1,10,20,30,99 switchport mode trunk switchport nonegotiate channel-group 2 mode desirable!interface GigabitEthernet0/19 description Link-to-HomeLAN-Mgmt switchport mode access!interface GigabitEthernet0/20 switchport mode access!interface GigabitEthernet0/21 description Mgmt-to-SW2960A switchport mode access!interface GigabitEthernet0/22 switchport mode access!interface GigabitEthernet0/23 description Mgmt-to-SW2960B switchport mode access!interface GigabitEthernet0/24 switchport mode access!interface Vlan1 ip address 192.168.1.221 255.255.255.0 no ip route-cache!ip classlessip http server!control-plane!line con 0 password <テスト用パスワード> loginline vty 0 4 password <テスト用パスワード> login transport input telnetline vty 5 15 password <テスト用パスワード> login transport input telnet!end設定のないインタフェース(15個)は省略している。
version 12.2no service padservice timestamps debug uptimeservice timestamps log uptimeno service password-encryption!hostname SW2960-A!logging buffered 16384 debuggingenable secret 5 <ハッシュ・非表示>!no aaa new-modelvtp domain LABvtp mode transparentip subnet-zero!no file verify auto!spanning-tree mode rapid-pvstspanning-tree extend system-idspanning-tree vlan 10 priority 28672spanning-tree vlan 20 priority 24576!vlan internal allocation policy ascending!vlan 10 name TEST-A!vlan 20 name TEST-B!vlan 30 name TEST-C!vlan 99 name NATIVE-TEST!interface Port-channel1 switchport trunk allowed vlan 1,10,20,30,99 switchport mode trunk switchport nonegotiate!interface Port-channel3 switchport trunk allowed vlan 1,10,20,30,99 switchport mode trunk switchport nonegotiate!interface GigabitEthernet0/9 description Trunk-to-SW3560 switchport trunk allowed vlan 1,10,20,30,99 switchport mode trunk switchport nonegotiate channel-group 1 mode active!interface GigabitEthernet0/10 description Trunk-to-SW3560 switchport trunk allowed vlan 1,10,20,30,99 switchport mode trunk switchport nonegotiate channel-group 1 mode active!interface GigabitEthernet0/13 description Trunk-to-SW2960B switchport trunk allowed vlan 1,10,20,30,99 switchport mode trunk switchport nonegotiate channel-group 3 mode on!interface GigabitEthernet0/14 description Trunk-to-SW2960B switchport trunk allowed vlan 1,10,20,30,99 switchport mode trunk switchport nonegotiate channel-group 3 mode on!interface GigabitEthernet0/19 description Mgmt-to-SW3560 switchport mode access!interface Vlan1 ip address 192.168.1.222 255.255.255.0 no ip route-cache!ip http server!control-plane!line con 0 password <テスト用パスワード> loginline vty 0 4 password <テスト用パスワード> login transport input telnetline vty 5 15 password <テスト用パスワード> login transport input telnet!end設定のないインタフェース(19個)は省略している。
緑の行は、Port-channel1の作成と、メンバーポートの channel-group 1 の行である。この設定全体は、この記事の検証をすべて終えた後の設定ファイルである。
SW2960-Aにも、同じ設定を入れた(encapsulationの行は不要)。メンバーポートは、設定の途中にループができないよう、先にshutdownしておき、両端の設定後に no shutdown した。
Group  Port-channel  Protocol    Ports
1      Po1(SU)         LACP      Gi0/9(P)    Gi0/10(P)
Po1(SU) は、Port-channelがレイヤ2(S)で使用中(U)の意味。メンバーの (P) は、束ねられている(bundled)ことを示す。STPからは、Po1が1本のリンク(コスト3)として見えるようになった。
4. PAgPでPo2を構成し、モードの組合せを確かめる(SW3560 ⇔ SW2960-B)
SW3560(config)# interface range GigabitEthernet0/11 - 12 ← 束ねる2本のポートをまとめて設定する
SW3560(config-if-range)# channel-group 2 mode desirable ← Po2に加える。PAgPで、自分から束ねようと誘う(desirable)
SW2960-B(config)# interface range GigabitEthernet0/11 - 12 ← SW2960-B側も、同じ2本の設定モードに入る
SW2960-B(config-if-range)# channel-group 2 mode auto ← Po2に加える。PAgPで、誘われたら束ねる(auto)
設定全体を見る(この設定の後の SW3560)
version 12.2no service padservice timestamps debug datetime msecservice timestamps log datetime msecno service password-encryption!hostname SW3560!boot-start-markerboot-end-marker!logging buffered 16384enable secret 5 <ハッシュ・非表示>!no aaa new-modelsystem mtu routing 1500vtp domain LABvtp mode transparentip subnet-zero!spanning-tree mode rapid-pvstspanning-tree extend system-idspanning-tree vlan 10 priority 24576spanning-tree vlan 20 priority 28672!vlan internal allocation policy ascending!vlan 10 name TEST-A!vlan 20 name TEST-B!vlan 30 name TEST-C!vlan 99 name NATIVE-TEST!interface Port-channel1 switchport trunk encapsulation dot1q switchport trunk allowed vlan 1,10,20,30,99 switchport mode trunk switchport nonegotiate!interface Port-channel2 switchport trunk encapsulation dot1q switchport trunk allowed vlan 1,10,20,30,99 switchport mode trunk switchport nonegotiate!interface GigabitEthernet0/1 shutdown!interface GigabitEthernet0/2 shutdown!interface GigabitEthernet0/5 description VLAN-Test-PC-A switchport access vlan 10 switchport mode access spanning-tree portfast!interface GigabitEthernet0/9 description Trunk-to-SW2960A switchport trunk encapsulation dot1q switchport trunk allowed vlan 1,10,20,30,99 switchport mode trunk switchport nonegotiate channel-group 1 mode active!interface GigabitEthernet0/10 description Trunk-to-SW2960A switchport trunk encapsulation dot1q switchport trunk allowed vlan 1,10,20,30,99 switchport mode trunk switchport nonegotiate channel-group 1 mode active!interface GigabitEthernet0/11 description Trunk-to-SW2960B switchport trunk encapsulation dot1q switchport trunk allowed vlan 1,10,20,30,99 switchport mode trunk switchport nonegotiate channel-group 2 mode desirable!interface GigabitEthernet0/12 description Trunk-to-SW2960B switchport trunk encapsulation dot1q switchport trunk allowed vlan 1,10,20,30,99 switchport mode trunk switchport nonegotiate channel-group 2 mode desirable!interface GigabitEthernet0/19 description Link-to-HomeLAN-Mgmt switchport mode access!interface GigabitEthernet0/20 switchport mode access!interface GigabitEthernet0/21 description Mgmt-to-SW2960A switchport mode access!interface GigabitEthernet0/22 switchport mode access!interface GigabitEthernet0/23 description Mgmt-to-SW2960B switchport mode access!interface GigabitEthernet0/24 switchport mode access!interface Vlan1 ip address 192.168.1.221 255.255.255.0 no ip route-cache!ip classlessip http server!control-plane!line con 0 password <テスト用パスワード> loginline vty 0 4 password <テスト用パスワード> login transport input telnetline vty 5 15 password <テスト用パスワード> login transport input telnet!end設定のないインタフェース(15個)は省略している。
Po2は、モードを3通りに変えて確認し、最終形は desirable/desirable にした。Port-channel2のトランク設定は、Po1と同じである。
Po2は、PAgPで構成した。モードを3通りに変えて、結果を確認した。
| SW3560側 | SW2960-B側 | 結果 |
|---|---|---|
| desirable | auto | Po2(SU) PAgP、Gi0/11(P) Gi0/12(P)(束なる) |
| auto | auto | Po2(SD)、Gi0/11(I) Gi0/12(I)(束ならない。pagp neighbor なし) |
| desirable | desirable | Po2(SU)(束なる。最終形) |
覚え方
desirableは「束ねよう」と誘う側、autoは「誘われたら束ねる」側。auto同士は、どちらも誘わないので、束ならず、メンバーは単独(I)のトランクポートのままになる。
Po2を構成するために、メンバー2本をshutdownしたとき、PC-A⇔PC-Bの通信が約0.6秒途切れた(615/616/602 ms)。通信が通っていた直通リンクが2本とも切れたため、RSTPが、SW2960-A経由の迂回路に切り替えた時間である。
5. staticでPo3を構成し、モード不一致を再現する(SW2960-A ⇔ SW2960-B)
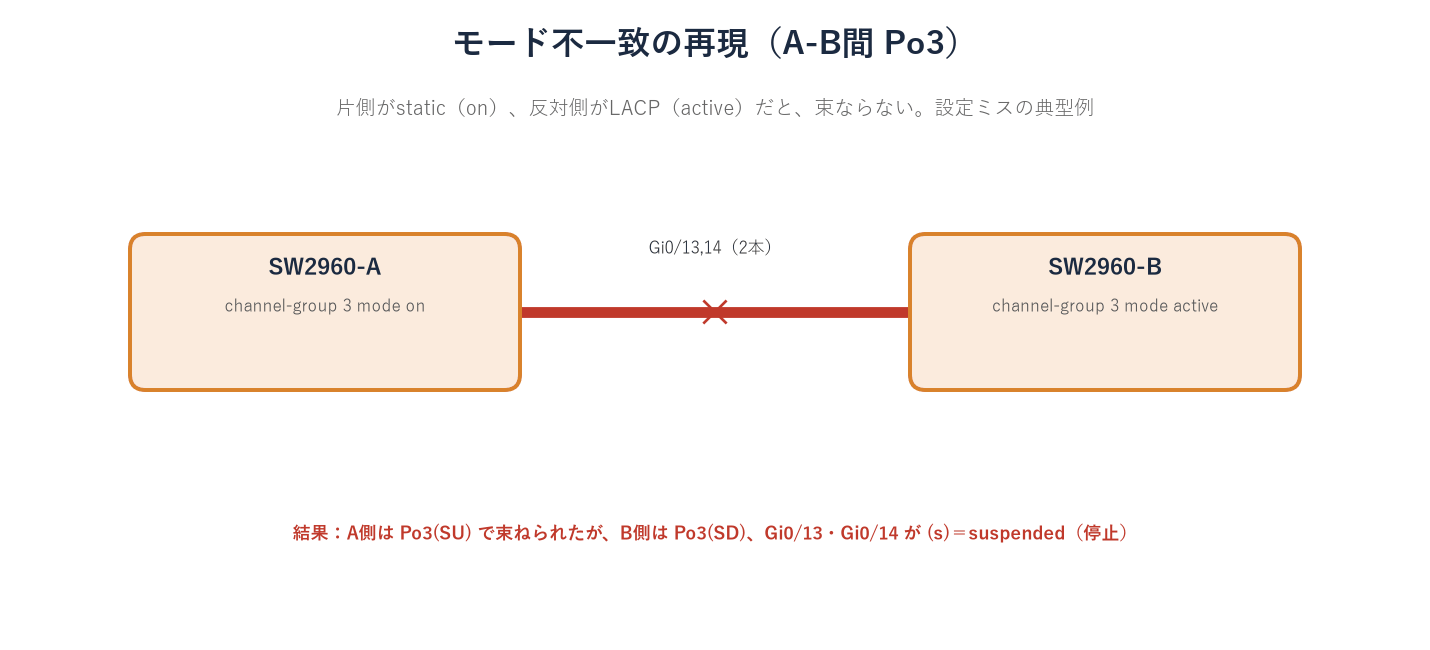
SW2960-A(config)# interface range GigabitEthernet0/13 - 14 ← 束ねる2本のポートをまとめて設定する
SW2960-A(config-if-range)# channel-group 3 mode on ← Po3に加える。ネゴシエーションなしで、強制的に束ねる(static)
SW2960-B(config)# interface range GigabitEthernet0/13 - 14 ← SW2960-B側も、同じ設定モードに入る
SW2960-B(config-if-range)# channel-group 3 mode on ← 同じく、onで束ねる
設定全体を見る(この設定の後の SW2960-A)
version 12.2no service padservice timestamps debug uptimeservice timestamps log uptimeno service password-encryption!hostname SW2960-A!logging buffered 16384 debuggingenable secret 5 <ハッシュ・非表示>!no aaa new-modelvtp domain LABvtp mode transparentip subnet-zero!no file verify auto!spanning-tree mode rapid-pvstspanning-tree extend system-idspanning-tree vlan 10 priority 28672spanning-tree vlan 20 priority 24576!vlan internal allocation policy ascending!vlan 10 name TEST-A!vlan 20 name TEST-B!vlan 30 name TEST-C!vlan 99 name NATIVE-TEST!interface Port-channel1 switchport trunk allowed vlan 1,10,20,30,99 switchport mode trunk switchport nonegotiate!interface Port-channel3 switchport trunk allowed vlan 1,10,20,30,99 switchport mode trunk switchport nonegotiate!interface GigabitEthernet0/9 description Trunk-to-SW3560 switchport trunk allowed vlan 1,10,20,30,99 switchport mode trunk switchport nonegotiate channel-group 1 mode active!interface GigabitEthernet0/10 description Trunk-to-SW3560 switchport trunk allowed vlan 1,10,20,30,99 switchport mode trunk switchport nonegotiate channel-group 1 mode active!interface GigabitEthernet0/13 description Trunk-to-SW2960B switchport trunk allowed vlan 1,10,20,30,99 switchport mode trunk switchport nonegotiate channel-group 3 mode on!interface GigabitEthernet0/14 description Trunk-to-SW2960B switchport trunk allowed vlan 1,10,20,30,99 switchport mode trunk switchport nonegotiate channel-group 3 mode on!interface GigabitEthernet0/19 description Mgmt-to-SW3560 switchport mode access!interface Vlan1 ip address 192.168.1.222 255.255.255.0 no ip route-cache!ip http server!control-plane!line con 0 password <テスト用パスワード> loginline vty 0 4 password <テスト用パスワード> login transport input telnetline vty 5 15 password <テスト用パスワード> login transport input telnet!end設定のないインタフェース(19個)は省略している。
| SW2960-A側 | SW2960-B側 | 結果 |
|---|---|---|
| on | on | Po3(SU)、プロトコル欄「-」(ネゴシエーションなし)、Gi0/13(P) Gi0/14(P) |
| on | active(LACP) | A側は Po3(SU) で束ねられたが、B側は Po3(SD)、Gi0/13(s) Gi0/14(s)(suspended) |
不一致のときも、err-disabled(ポート自動停止)にはならず、B側のメンバーが suspended になった。on に戻すと復旧した。
注意
片側だけstatic(on)にして、反対側をLACPなどにする設定ミスでは、「片側だけ束ねられて、反対側は停止」という中途半端な状態になる。
6. 束ねたリンクの1本が切れたときの不通時間
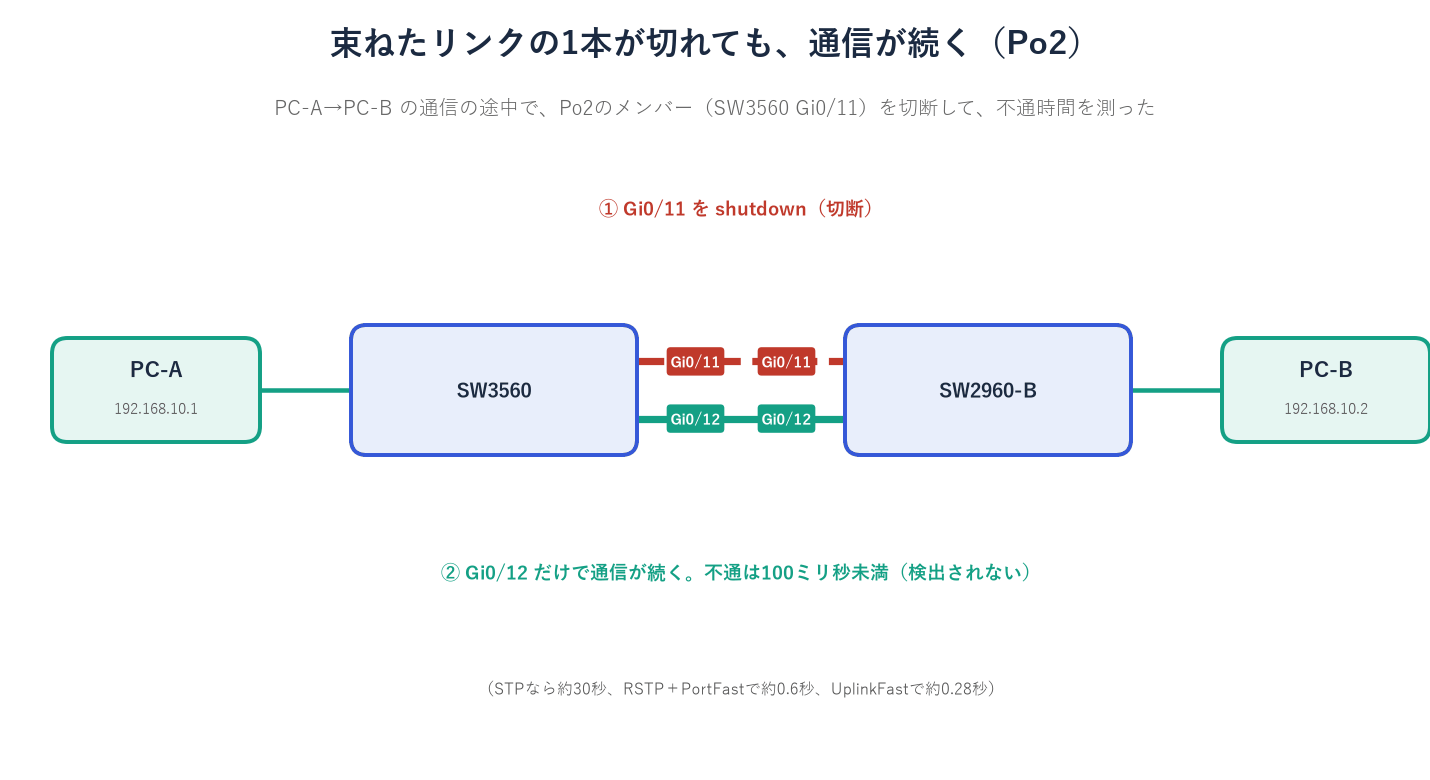
PC-A⇔PC-Bの通信が通るPo2のメンバー(SW3560 Gi0/11)を、shutdown/no shutdown(各3回)して、PC-Aの測定スクリプトで不通時間を記録した。
| 確認 | 結果 |
|---|---|
| 切断中の状態 | Po2(SU) Gi0/11(D) Gi0/12(P)(Gi0/11が停止、Gi0/12だけで通信) |
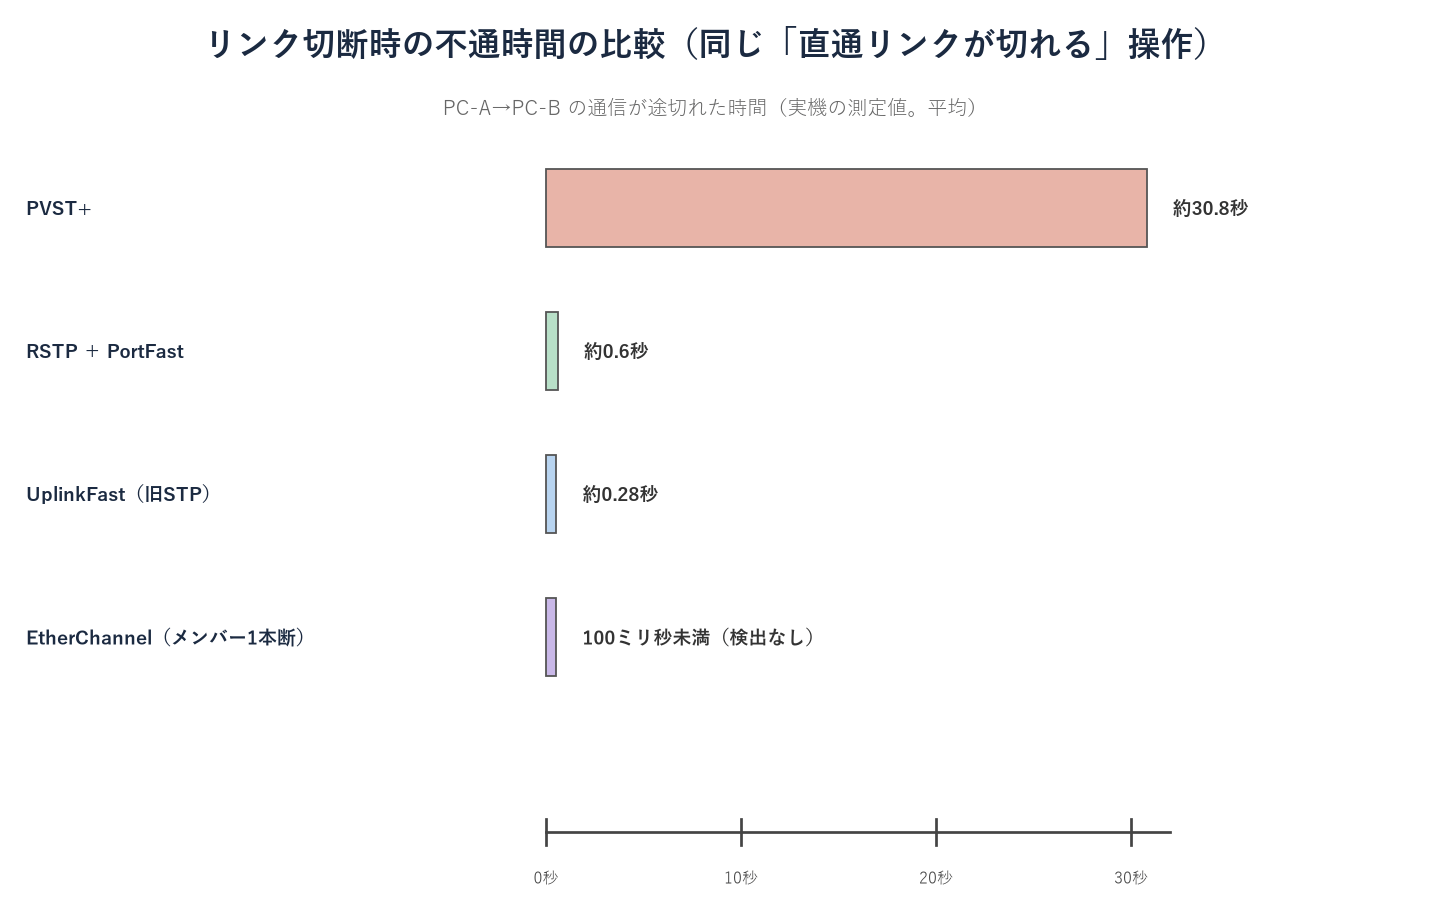
| 不通時間(切断・復旧とも) | 測定スクリプトにLOSTの記録なし=100ミリ秒未満(検出なし) |
| 復旧後 | Gi0/11(P) Gi0/12(P) に戻った |
実機で分かった点
EtherChannelは、メンバーが1本切れても、残りのメンバーで通信を続けるので、STPのような経路の再計算が起きない。PVST+の約30.8秒、RSTP+PortFastの約0.6秒、UplinkFastの約0.28秒より、さらに短い(100ミリ秒未満)。
7. 負荷分散の方式
EtherChannelは、フレームの送信元MACアドレスなどから、どのメンバーを使うかを決める(負荷分散)。
- 既定の方式は src-mac(送信元MACアドレス)。
- 選べる方式:dst-ip/dst-mac/src-dst-ip/src-dst-mac/src-ip/src-mac。
- test etherchannel load-balance interface Port-channel2 mac <送信元> <宛先> で、どのメンバーが選ばれるかを確認できた(例:Would select Gi0/11 of Po2)。
8. L3 EtherChannel(SW3560のみ)
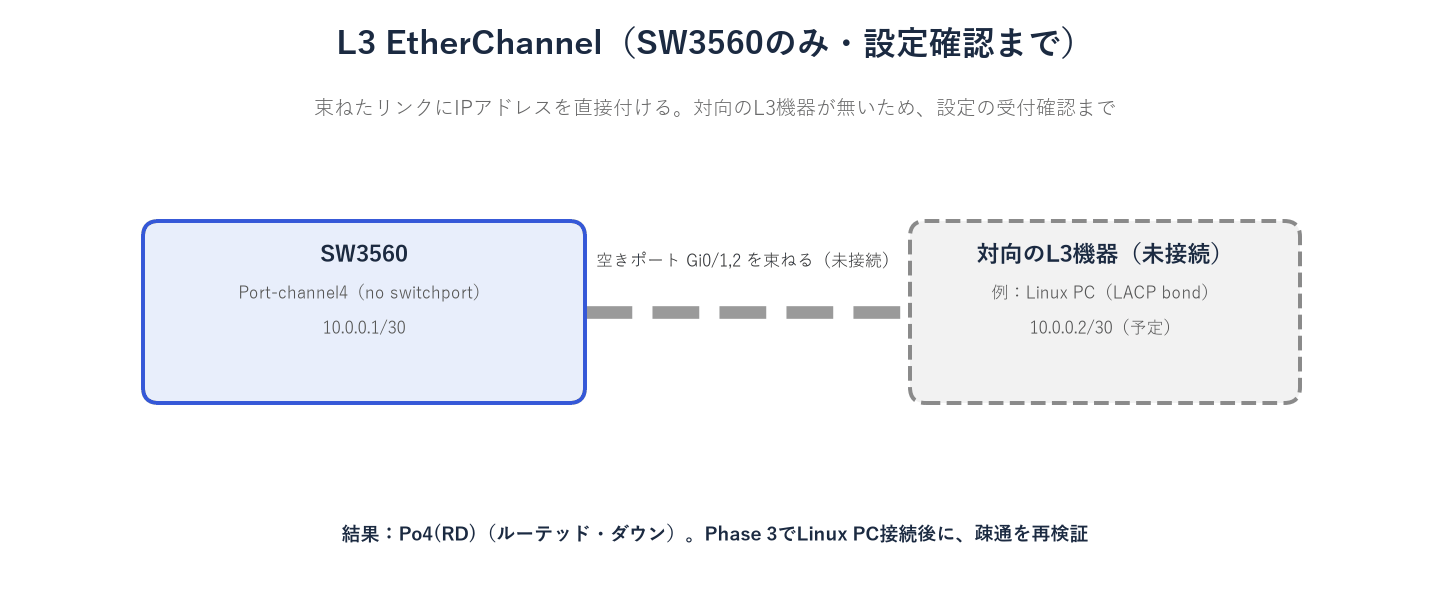
束ねたリンクにIPアドレスを直接付ける方式(ルーテッドポート)。相手のL3機器がまだ無いので、空きのポート(Gi0/1・Gi0/2)で、設定が受け付けられるかを確認した。
SW3560(config)# ip routing ← ルーティング(L3の転送)を有効にする
SW3560(config)# interface range GigabitEthernet0/1 - 2 ← 空きの2本のポートをまとめて設定する
SW3560(config-if-range)# no switchport ← ポートを、スイッチポート(L2)から、ルーテッドポート(L3)に変える
SW3560(config-if-range)# channel-group 4 mode active ← Po4に加える(LACP)
SW3560(config)# interface Port-channel4 ← Po4の設定モードに入る
SW3560(config-if)# no switchport ← Po4も、ルーテッドポートにする
SW3560(config-if)# ip address 10.0.0.1 255.255.255.252 ← Po4に、IPアドレスを直接付ける
show etherchannel summary ほか の結果を見る(SW3560、設定した後、主要な行)
4 Po4(RD) LACP Gi0/1(D) Gi0/2(D)Port-channel4 10.0.0.1 YES manual down downshow etherchannel summary と show ip interface brief の出力のうち、主要な行を抜粋した。この設定は、確認の後に削除したので、保存した設定ファイルには残っていない。
設定は受け付けられ、show etherchannel summary は Po4(RD)(R=レイヤ3、D=ダウン)、show ip interface brief は Port-channel4 が 10.0.0.1 の down/down と表示した。対向機器が無いのでダウンしたままで、疎通の確認は、Phase 3で、Linux PCを接続してから行う。
9. トラブルの再現
Po3のメンバー(SW2960-A Gi0/14)の設定を、1つずつ変えて、症状とログを確認した。ログは、%EC-5-CANNOT_BUNDLE2 で、理由が括弧の中に出る。
| 誤設定 | 症状 | ログの理由(括弧の中) |
|---|---|---|
| allowed vlan を変更 | Gi0/14 が (s) | vlan mask is different |
| speed 100 に固定 | Gi0/14 が (s) | speed of Gi0/14 is 100M, Gi0/13 is 1000M |
| access ポートに変更 | Gi0/14 が (s) | dtp mode of Gi0/14 is off, Gi0/13 is on |
| Gi0/14 だけ別のグループ(5)に | Po3 は Gi0/13 の1本のみ | — |
| LACP passive ⇔ passive(両端) | Po3(SD)、Gi0/13・14 が (s) | LACPのパートナーがいない |
切り分けの手順
束ならないときは、まず show etherchannel summary でフラグ(s/I/D)を見て、次に show logging の CANNOT_BUNDLE2 の括弧の中の理由を読むと、原因が分かる。
10. 三角形の最終構成
3組とも束ねた最終構成:SW3560は Po1(LACP)と Po2(PAgP)、SW2960-Aは Po1 と Po3(static on)、SW2960-Bは Po2 と Po3。STPのブロックは、Port-channel単位で決まり、VLAN10では、SW2960-Bの Po3 が Altn BLK、他のPort-channelは転送している。各Port-channelのコストは3だった。
11. 実機でしか分からない点・つまずきポイント
- 束ねる前は、並行する2本のうち1本が、STPにブロックされている。
- メンバーポートは、設定の途中にループができないよう、先にshutdownしてから、両端を設定する。
- PAgPのauto同士は、束ならない(メンバーは単独の (I) のまま)。
- 片側がon、反対側がLACPのとき、LACP側のメンバーは suspended になる(err-disabledにはならない)。
- 束ならない理由は、show logging の %EC-5-CANNOT_BUNDLE2 の括弧の中に出る。
- メンバー1本の切断では、不通は100ミリ秒未満(検出されない)。2本とも切れると、約0.6秒(RSTPの迂回)。
- L3 EtherChannelは、対向機器が無いと、ダウン(RD)のまま。
12. まとめ
EtherChannelで、並行する2本のケーブルを1本に束ねると、STPのブロックがなくなり、メンバー1本が切れても通信が続いた。束ねる方式(LACP・PAgP・static)は、モードの組合せで、束なる・束ならないが決まり、設定ミスは、show etherchannel summary のフラグと、ログの理由で、原因を切り分けられる。次は、リンクの異常を検知する機能(UDLD・errdisable)と、隣接機器の情報(CDP・LLDP)を扱う。